GregableBlog of Greg Grothaus.2026-08-28T00:00:00Zhttps://gregable.com/Greg Grothausgreg@grot.hausPorchWeather: Know when to open your windows2026-08-28T00:00:00Zhttps://gregable.com/2026/08/porchweather.htmlI turned my favorite home automation into a free website that tells you when to open and close your windows.
Back in 2022, I wrote a post about my
home automations. My favorite one on the list was the simplest sounding:
a notification telling me when to open or close the windows. I ended that
section with this:
I've been thinking about making a website where anyone can register for
these kinds of alerts by entering a zip code or lat / long, as well as a
phone number to text when it's time to open or close the windows. I don't
know if I'll actually do this though.
Well, four years later, I actually did it:
PorchWeather.com. You tell it where
you live and what conditions you consider window-worthy, and it
emails you or pings your phone when it's time to open up, and again when
it's time to close.
The PorchWeather landing
page.
Why this automation stuck
In the Bay Area, the summer weather pattern is remarkably consistent: warm
to hot afternoons, then cool evenings once the marine air moves back in.
On most summer days, the outside air is cooler than my house from the
evening until mid-morning. If you open the windows during that stretch and
close them before it heats up, the house coasts through the hot part of the
day on the cool air you banked overnight. It's air conditioning, except the
compressor is the Pacific Ocean and it's free.
The trick is timing. Open too early and you're letting in hot air. Forget
to close in the morning and the house warms right up with the day. And the
temperature isn't the only thing that matters: sometimes it's cool out but
the air is full of wildfire smoke, a real hazard around here in the fall,
or it's windy and unpleasant, or the humidity is off enough that
the cool air isn't worth it.
So for years I ran this as a Home Assistant automation. It watched a local
weather station for temperature, wind, rain, and humidity, watched nearby
air quality sensors for particulates, compared against the indoor
temperature from my thermostat, and sent a phone notification when the air
outside was better than the air inside. When conditions flipped, it sent
another notification to close things up.
What I liked about it then is still what I like about it now: it's almost a
software-only automation. No motors, no smart vents, no hardware to
install. The human is the actuator. It just turns out that the hard part of
"open the windows at the right time" was never opening the windows, it was
noticing the right time.
From automation to website
The problem with a Home Assistant automation is that it only helps people
who run Home Assistant, and realistically only people who enjoy fiddling
with YAML. The idea itself needs none of that. All of the inputs are
public weather data. There's no reason my neighbor should need a home
server to get the same notification.
So PorchWeather is that automation, rebuilt as a service anyone can use.
You add a location by dropping a pin on a map, then set your conditions:
a comfortable temperature range, and optionally limits on humidity, wind,
chance of rain, dew point, and air quality. A worker re-checks the weather
for every active location every ten minutes, and when your conditions
become true it notifies you that it's window time. When they stop being
true, it tells you to close up.
A few details took more thought than I expected. Weather wobbles around
thresholds, so there's hysteresis to keep it from telling you to open and
close the windows five times in an hour, the same debouncing trick I
needed for my backyard gate
sensor years ago. There are quiet hours, since
a 5am "it's nice out!" push notification is a good way to get unsubscribed.
And the notification direction is configurable, because some people only
want the "open" nudge and are perfectly capable of noticing when it gets
hot.
For the weather data, I self-host an instance of
Open-Meteo, which reads model output
directly from the public open-data archives. For locations in the
contiguous US, that
means NOAA's HRRR model at 3 km resolution, updated hourly, with a
global ECMWF model covering everywhere else. One of the quiet wonders of
the modern internet is that this data, a running physics simulation of the
entire atmosphere, is just sitting in a public bucket, free for anyone to
build on.
Give it a try
If you live somewhere with a real daily temperature swing — most of
the western US, but plenty of other places too — this is the kind of
thing that saves you money on cooling while getting fresher air in the
house than any AC will give you. And if you live somewhere muggy, the dew
point condition can tell you about those rare crisp days worth throwing
the windows open for.
It's free, and there's no catch. This is a hobby project that escaped
the house, not a startup. If you try it and something doesn't work, or the
notifications fire at times that seem wrong for your area, I'd genuinely
like to hear about it.
]]>My vacuum waits by the trashcan to be emptied2022-11-22T00:00:00Zhttps://gregable.com/2022/11/vacuum-trashcan.htmlHow I automated my vacuum to head to the trashcan after cleaning.My robot vacuum positioned next
to a trashcan.
I have a robot vacuum, but not one of the higher end models that empties
itself. Instead, I've set up my vacuum to drive itself over to the
trashcan when it needs emptying. Here's how it works.
Honestly, I think this is a feature that should be implemented by default
on most robot vacuums. It would require no changes to the hardware, just
a new software feature. Perhaps it would reduce sales of the higher priced
self-emptying models though.
To get started, I first needed to hook up the vacuum to Home Assistant.
This was not that easy, but I found this
guide on smarthomepursuits.com to get things rolling. The short
version is that you set up the robot using the manufacturer's generic app,
rather than the Roborock app. Then you use a script to extract the vacuum
cloud tokens for sending commands. I also assigned the vacuum a fixed ip
on my local network which IIRC made things a little easier. I won't repost
those instructions, because they are great.
The next step is to understand out how the "go to" command works. Here is
a screenshot from Home Assistant showing the service with params X and Y.
Home Assistant Services Page showing the xiaomi_miio.vacuum_goto
service.
The X and Y aren't well documented, but my understanding is that they are
approximately millimeters from the charging base at (0, 0). If you look at
the floor map in your house, anything to the upper right from the charger
will be positive X, positive Y.
I didn't pull out a tape measure. Instead, I just tried some numbers, saw
where the vacuum ended up, and tried new numbers. After a few iterations
of this, I was where I wanted the vacuum to stop for emptying.
The next thing to track is the state. "vacuum.roborock_vacuum_a19" has
several statuses in my testing:
Docked
Cleaning (also set during "go-to" travel)
Paused
Idle
Returning to dock
Unfortunately, my vacuum didn't seem to register a state for any dust-bin
changes, such as the bin being taken out or put back in.
To make this all work, I create a new state variable that I track,
initially set to "clean". When the status goes to "cleaning", I set my
state to "dirty". Then, when the vacuum status goes to "docked" and my
state is "dirty", I call the command to go to the trash can and set my
state to "waiting". Finally, when the vacuum status goes to "docked" and
my state is "waiting", I set my state to "clean".
I've actually punched this state machine up a little bit over time, so
that it won't leave the charger if I'm not home or the battery is too low
that it might run out while waiting for me to empty, but that's all
unnecessary. You can see my appdaemon script here if it's useful.
]]>GPU Prices leading up to the Ethereum Merge2022-09-17T00:00:00Zhttps://gregable.com/2022/09/ethereum-merge-gpu-prices.htmlA chart of the price drops of GPUs on eBay. Also a bonus chart of price per hashrate.
Three days ago, just before midnight PST on September 14, the Ethereum
cryptocurrency completed The Merge.
Prior to The Merge, new ethereum was created by "proof-of-work" mining
which involved GPUs consuming electricity and producing ethereum,
that could in turn be sold for money. The GPUs used are the same type of
computer hardware that can play the latest video games in your computer.
Up until The Merge, there were roughly 20 million GPUs running the mining
program. It is estimated that this was using 23 million MWh of power per
year.
The demand for GPUs shot up in 2021 when the price of ethereum
skyrocketed. This inflated prices for GPUs during a worldwide chip
supply chrunch. For a while, it was become near impossible to buy GPUs
except on the resale market, such as eBay.
After The Merge, which was known in advance, GPUs can no longer be used
to mine ethereum, and cannot profit mining other coins. The party is over.
Good Riddance.
Last year I scraped some eBay sold prices for various GPUs. I repeated it
this year, though there is a gap in my data. The resulting charts are
pretty telling of how The Merge has decimated GPU prices.
Prices for various GPUs on eBay.
The next chart shows the same data, but each card is divided by the
estimated MH/s it produces, which is essentially the speed it mined
ethereum. I also use a 10 day trailing moving average to smooth out the
spikes a little bit.
GPU Prices per ethereum megahash per second (MH/s).
I don't know why cards seem to have an uptick right before the
merge. It's possible that it's thin volume, or just the news cycle
around The Merge creating some interest in purchases at a bargain.
I have no crystal ball, but I suspect these prices will fall a good bit
more in the near future. There are a lot of ethereum miners who believed
that they would be able to profitably mine something after The
Merge, or that The Merge simply wouldn't happen. These folks are quickly
learning otherwise. Also, the next generation 4000 series NVidia cards are
nearing release, which should reduce demand for the previous generation
even further.
]]>My Home Automations2022-03-24T00:00:00Zhttps://gregable.com/2022/03/home-automations.htmlA description of some of the home automations I've come up with.
My last post described some of
my setup for Home Assistant. Since then, I've been writing a number of
automations for my house, ranging from simple to not so simple. I thought
I'd share some of these ideas here.
Gate Monitoring
My backyard has a wood fence with a single gate that I usually leave
closed. For security, I wanted to know when the gate has been opened.
To make this work, I use a small Sensative z-wave reed
switch. It has an enclosed battery that is supposed to last around
10 years. To make this a little more durable and hidden, I dug
out a slot in a piece of wood and painted over the switch:
Sensor dug into a wood block
with glue.Hidden under electrical tape
and paint.
Attached to the gate, with a small magnet attached on the other side, I
recieve events for when the gate is open or closed. On open, it notifies
my phone or voice announces on a Google Home Hub indoors.
However, there are a few tricks. First, if it gets windy,
sometimes the gates move enough that it triggers an "open". So, I don't
trigger an event until the gate has been open for a couple seconds,
otherwise I ignore it. Second, I don't want to get a flurry of
notifications if someone is going in and out, so once the gate is closed,
I disable notifications for the next 10 minutes. This timer resets and
extends if it's opened again during this 10 minute period.
Holiday Lights
Last year, I installed LED
lights along my roof line for holiday times. Home Assistant can hook
into this and select different displays for different holidays. I now have
settings for 8 different holidays:
St. Patrick's Day
Easter
Memorial Day
4th of July
Halloween
Thanksgiving
Christmas
New Years
For some holidays, I rotate through multiple patterns, changing every 2
minutes. Everything starts at sundown and shuts off at 11pm, except for
New Years where it runs until a little past midnight.
One annoying "feature" is that the LED strips actually consume power even
when not displaying any light. While this is probably not a lot of energy,
it's also heat that wears out the LEDs faster. So, this automation first
turns on a smart switch, then when the WLED server comes up, it starts
sending commands on which patterns to display.
PG&E Rate
PG&E: Partial Peak
My electric rate plan charges me different amounts of money for power at
different times. There are three time periods with increasing prices: off
peak, partial peak, and peak. This automation publishes a signal that
indicates which period we are in. It's used by other automations.
Computing this is pretty simple. The schedule is different in summer
(May-Oct) from sinter (Nov-Apr), different on weekends vs. weekdays.
Otherwise, it's just a lookup table.
Car Charger
I have my electric car plugged into a normal 120V outlet, with a smart
plug controlling it. This automation turns the charger on when the
PG&E rate is offpeak, and then back off otherwise. Pretty simple, and
I can override with a button press either at the plug or on my phone if I
need a charge sooner.
TV State
Similar to to the PG&E rate, I want to know if the TV is on. I use this
for doing things like turning off a noisy dehumidifier.
My TV isn't very smart, but it has a USB port that powers a Chromecast.
The Chromecast has power iff the TV is on. Home Assistant knows how to
talk to the Chromecast, and can read it's state which are values like
"Playing", "Paused", "Idle". And when the Chromecast is powered off, we
get "Unavailable". So this automation basically reduces this enum to a
"on" and "off", republishing those states. There is a several second delay
while things boot or timeout on the network, but this is shorter
than it takes me to start playing something, so I'm quite fine with it.
Dehumidifier
I have a dehumidifier, mostly for the summer, to keep the humidity down in
the house. I put it on a smart plug and only run it when the thermostat
detects high humidity, the PG&E rate is "offpeak", and the TV isn't on.
Porch Lights
This one is probably the most involved. I installed an Innovelli
Red smart switch to control my front porch lights. It has an LED
indicator on the switch that I can control. The basic automation is to
turn on the lights for 10 minutes if anyone comes up on the porch, but
there were a lot of details to get right.
First are the trigger events. I have a camera doorbell, so I trigger if
the doorbell is rung or a face is detected. I have a door sensor, so I
trigger if the door is opened. I also geofence my and my wife's cell
phones, so when we arrive home, it triggers. And of course, these are all
disabled during the day.
Next is local override. If the lights are already on, I don't want to
start up a timer and turn them off 10 minutes after an event. I want them
to stay on. Similarly, if during an event, the user presses the light
switch (up or down), I want this to override the light and the
timer. So, an up press leaves the lights on but disables the timer.
This state (if we're on a timer or override) would be hidden to the user,
so I use the LED indicator on the side of the light switch to indicate a
timer is running, by having a Knight Rider
style animation running when a timer is
going, disabled if not.
Finally, when the timer isn't running, I use the LED indicator color to
give me a estimate of the air quality outside at a glance. This is
becoming an issue in the fall in California. So I bracket AQI into
green-yellow-red-purple on a low intensity so it's not annoying.
This one has a lot of timers and possible states going on, so it was the
automation that really got me looking into how to add test code to my
setup.
Robot Vacuum
I have a Roborock S4 Vacuum which, when finished, will automatically go
back to it's dock and charge. The only problem is that it's tucked away in
a less used part of the house, and the robot's dustbin is fairly small. I
basically need to empty the dustbin after every run.
This automation tracks if the dustbin is full or not by monitoring the
robot's cleaning run. When the dustbin is full, it will wait until the
robot has charged up to 90% battery, and will then undock the robot and
drive over to the trashcan in the kitchen and wait for me to empty it.
Once I've done so, it'll drive back to it's charger. Pretty convenient!
One time I was not around and it ran the battery down waiting for me. So,
I added an extra routine so that if the battery drops too low, it'll drive
back to the dock, recharge, and then return to the trash can. This doesn't
get much use, but it's an added convenience.
Open the windows
This might be my favorite. I monitor the local weather station for
temperature, wind speed, rain, and humidity. I also monitor nearby air
quality monitors for particulates. Finally, I track the temperature and
humidity inside from my thermostats. When everything is such that the air
outside is same or better than inside, I send a notification to my phone
to open the windows. When things turn around, I send another notification
to close them.
Close the windows, it's too cold!
What I like about this is that it almost a software-only automation. If I
simplified and ignored the inside thermostats, all of the computations use
data online from weather and air quality stations. And there are no motors
or lights to turn on or off, a human does the actual work.
I've been
thinking about making a website where anyone can register for these kinds
of alerts by entering a zip code or lat / long, as well as a phone number
to text when it's time to open or close the windows. I don't know if I'll
actually do this though.
Fun
These automations don't really make a huge difference in my life. At most,
they save me a few seconds or help me remember to do things, but they
are all minor. That said, I've enjoyed coding them up and figuring out
how to make everything work. Perhaps I'll bore of it, or maintenance will
become a chore, but for now I'm enjoying playing with it all.
]]>Home Automation with Home Assistant 2021-12-12T00:00:00Zhttps://gregable.com/2021/12/home-assistant.htmlWhat I learned so far trying out Home Assistant
Back in the fall, I started playing with home automation. I had researched
some of these things in past years, but concluded that they seemed too
much of a hassle then. My opinion this time around has changed, but
it's still not for everyone.
A few things have progressed that I think really made this interesting for
me:
With California's bad fall wildfire season, I got interested in indoor
Air Quality and had sensors / filters set up for the house.
The big spikes are cooking - I had no idea.
I've learned more. My roof
lighting project got fully underway and I gained a good deal of
experience along the way.
Parts have gotten cheap. A 3-pack of ESP8266 NodeMCU systems is $15 on
Amazon. $5 gives you a programmable system with WiFi that can be powered
from micro-usb.
$5 gets you a full programmable system with WiFI.
Even full products are cheap - consider for
example this WiFi
Smart Plug that sells for between $10 and
$23.
Wireless sensors that can run for years on batteries. Running wires
isn't always practical. Replacing batteries isn't fun. The NodeMCU
in low power mode can probably run for over a year on a single AA. A
lower power protocol like Z-Wave with a lithium battery can do even
better. For example, this
expensive contact sensor has a built in battery that is supposed
to last 10 years.
This area still seems immature. Lots of devices, competing protocols,
and different controllers. A lot of people's experience will be 3-4
different apps each controlling 1-2 devices over a proprietary app
interace. If all you want to do is set a daily schedule for a light or
voice enable something, this works rather well.
I never really felt that voice commands for turning on lights were an
improvement over a wall switch. More of a gimmick. Here's a better example
of what I had in mind:
I have a dumb dehumidifier on a smart power outlet. I want the
dehumidifier to:
The dehumidifier can achieve #1 and #2 on it's own, though it is
rudimentary. The smart plug can achieve #3 via the proprietary
app, though I had to reset the schedule twice a year between summer /
winter power schedule periods. The closest I could do to #4 was manually
yelling at some smart assistant. The engineer in me was unsatisfied.
There are lots of options available. I wanted the following:
Broad interoperability, even custom devices that I might solder
together.
I can write arbitrary code. I didn't care about the other user
interfaces, just the software user interface. I am not the typical user
here though.
Runs locally; works with no internet. This I could have compromised
on and I may one day move everything to the cloud. The main reason
is latency, but also resilience, cost, and control.
Low-power. I didn't want to keep a 100W PC running all of the time.
Home Assistant
After extensive research, I settled on Home Assistant. If you prefer
to write code than use GUIs, I don't think there is any other choice.
To clarify naming, Home Assistant (HA) is a few things. HA Core is a
python program that manages the event loop. HA includes HA Core, a web UI,
and runs add-ons. You can run Home Assistant as an OS, an application, or
in a docker container. I'm going the OS route at the moment, which leads
to ...
Hardware
I chose to run Home Assistant on a Raspberry Pi 4. It's usually pretty
idle, pulling around 2-3 W but even loaded is only about 6W. I am
unconcerned about leaving this running all of the time. Per year,
around 25 kWh or <$5 in power costs.
I initially made the mistake of just using some SD card I had laying
around, but you do need one with decent I/O performance. I later picked up
the one that Tom's
Hardware recommended.
I am concerned about the
longevity of any SD card, but I haven't tackled that concern yet. If it
had been available at the time, I probably would have purchased the
Home Assistant Blue. I
spent ~$100 on the Raspberry Pi 4 as a kit with case and power supply, but
the HA Blue seems like improvement to the SD card situation.
(optional) As I went along, I also eventually picked up a USB Hub for
Z-Wave / Zigbee communication. This just plugs straight into the
Raspberry Pi and Home Assistant understands it.
Concepts: Entity / State
Home Assistant tracks the state over time of various values, representing
real world or synthetic measurements. The state of these values can then
be inputs into code. The name of one of these value is called an
'entity' and the current value is the 'state'. Each Entity / State is also
associated with one Dictionary of 'attributes' which can be anything and
is also mutable.
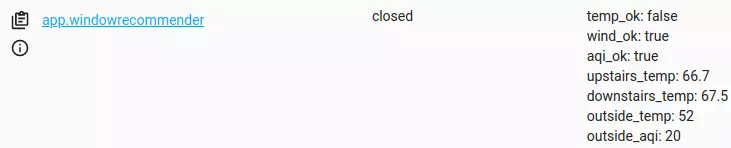
Here's an example entity, seen by clicking on "Developer Tools" in the HA
web interface. This entity is one that I created as an output of some code
which tells me when to open the windows. The entity is named
"app.window-recommender" (left column). The current state is "closed"
(middle column). The inputs to this decision process are the attributes
(right column). The outdoor temperature is too cold to open the windows,
but the air quality and wind are fine.
The state value is tracked historically over time for a
configurable window. If you click the little circled 'i' icon, you can
view the history. Here's the history for the chosen animation
routine of my Christmas LED lights, which changes to a new random value
every 2 minutes between Sunset and 11pm:
In both of these cases, the state is string valued, but many are numeric.
For example, here is the chart of the last week of wattage detected at the
inverter on 1 of my 18 solar panels:
I don't think the attributes are stored historically, but I could be
wrong. The attributes can be arbitrary, like the 'temp_ok: false' above.
There are also a number of specific
attributes that Home Assistant
understands and can use to automatically create UI elements such as
buttons, charts, etc. Here are a few:
friendly_name: A string label to use when displaying this entity state,
separate from the actual entity name string.
unit_of_measurement: The inverter above uses "W" for watts.
HA understands a few values, such as "C" and "F" and can convert these
to your preferred locale settings, but this can be anything.
These special attributes are used as automatic hints by HA's graphical
interfaces, such as in this widget which makes use out of all 3 of the
above by only telling HA which 3 entities we want:
Just to give you some taste for the kinds of things that might be
measured, here are a few that my HA can track:
Indoor Air Quality, PM2.5, VOC, Temperature, Humidity
Data from my cell phone (via installing HA client on phone):
GPS location
Lock Status
Battery %
Bluetooth devices detected
Idle/Walking/Running/Biking/Driving prediction
Daily Steps
Next alarm
Air pressure (hPa)
Ringer volume
Probability I'm asleep
State of my TV Chromecast.
Smart plug state (on / off) and current draw (Amps).
Power generation (watts) of each of 18 individual solar panels.
Data from my printer:
# of B/W pages printed, # of color pages
Percentage of each color toner remaining.
Percentage life used of the drum, fuser, and laser.
State of window / door contact sensors (open/closed and battery level)
Data pulled from the internet:
Current weather: temp, humidity, wind, pressure, forecast.
Outdoor air quality
Sunrise / Sunset based on the House's GPS coordinates.
Computed values:
Home / Away (phone geofencing)
Current PG&E rate per kWH (based on time of day)
The humidity of the outside air, if first heated / cooled to
indoor temperatures.
There are many things I can imagine adding. Here are a few ideas:
Distance sensor to measure the salt remaining in my water softener
tank.
Washer/dryer/dishwasher finishes running (vibration or just
power consumption).
If my mailbox is opened.
When my HVAC air filter has had air running through it for more than X
total hours. Maybe even adjusted by particulate measurements.
If the gate into my backyard has been opened.
Garage open / closed.
OBDI data pulled from my car every time I turn it on.
Current energy mix of the electrical grid.
Whether or not I'm currently in a video conference.
Concept: Services
The other thing that HA exposes are services (callbacks effectively). They
trigger some change, usually in a device like turning on a light switch or
smart plug. They can also be software only services or somewhere in
between, such as popping up a notification on a cell phone:
Results in:
Integrations
Home Assistant is great at automatically detecting available devices
on the network and prompting you to add them to tracked state. When I
first turned it on, it prompted me to set up solar panels, printer,
chromecast, internet weather, and some Kasa smart switches. Each of these
is called an "integration" and can be installed into HA. An
integration is basically a driver library for some device that can expose
one or more entities and services.
There are a large selection of integrations. For example, I added AirVisual
for tracking outdoor air quality, Nest for
thermostats and doorbell, extensions for my solar panels, Chromecast,
Phone, my LED lights, Kasa smart switches, and the Z-Wave USB stick. Most
things you can get onto the network, you can probably integrate, some
easier than others.
Nest was particularly cumbersome to set up. The instructions
are great, but to authenticate to Nest, you must expose HA on a domain
name serving on https / tls using the default port. You don't need to do
so permanently but to set it up. You also have to pay Google some money
one time. The process is essentially registering as a developer and
telling Google Nest that you are creating a Cloud application, though you
will be the only one using it. I got this working, but it was particularly
difficult.
As part of the Nest process, I used these
directions for making home assistant available on the internet via
Cloudflare. You'll need to do this if you want access / data from a
cell phone from outside of your home network. This is an excellent
time to set up 2-factor auth for Home Assistant.
Add-ons
If "integrations" are drivers, "add-ons" are apps. These appear to be
running processes that you can trivially install which sometimes have
their own UI or similar. I have a few that I'd recommend:
Home
Assistant Google Drive Backup. Install this first, so when your
device crashes you don't lose your hard work setting everything up.
AppDaemaon
4: This is the programming interface for HA. It's not pretty, but
it
works well. More on this later.
Studio Code
Server, aka VSCode in the browser. This will be used for editing
the code in AppDaemon. You can instead install a SSH client to edit
files.
Z-Wave
JS. If you are using the Z-Wave / Zigbee USB stick, you'll want
this
to configure your network for either.
Many
Others, though keep in mind you are running code on your local
network, so be careful!
AppDaemon 4
User-defined scripts that wire some combination of entity states to
service calls are core to HA. There are a variety of ways to do it.
HA itself has a YAML config language built in and some simple GUI
Wizards built on top. I think this is fine for basic things like:
"if this switch is toggled, toggle thse 3 lights", but I found them
awkward.
Lots of folks in the community swear by an add-on called Node-RED.
This is a slick graphical wire chart editor that lets you draw lines
between nodes and then configure them to do things. Create an input node
from a sunset event and drag a line to a porch light service switch to
turn on the porch at sunset. That kind of thing. This is super popular. I
spent some time with it. I ended up just creating a bunch of input nodes
that were event triggers, hooked up to one javascript code node which
output what I want to some service nodes. This was an awkward way to use
the tool. I'd recommend this for non-programmers, but I didn't care for
it.
Finally there is AppDaemaon. This is a process that runs alongside HA and
lets you write callback-style code in python to do whatever you want.
Here's an simple example script to control my dehumidifier plugged into a
smart switch:
import appdaemon.plugins.hass.hassapi as hass

class Humidifier(hass.Hass):
  def initialize(self):
    self.listen_state(self.EventCallback, "sensor.tv_state")
    self.listen_state(self.EventCallback, "sensor.pge_rate")
    self.listen_state(self.EventCallback,
                      "sensor.downstairs_thermostat_humidity")
    self.UpdateState()

  def EventCallback(self, entity, attribute, old, new, kwargs):
    self.UpdateState()

  def UpdateState(self):
    is_tv_on = (self.get_state("sensor.tv_state") == "on")
    is_dehumidifier_on = (self.get_state("switch.dehumidifier") == "on")
    pge_rate = self.get_state("sensor.pge_rate")
    humidity = float(self.get_state(
        "sensor.downstairs_thermostat_humidity"))

    # To avoid thrashing back and forth if the humidity is right on the
    # line, we set the goalState to be unmodified from the current
    # state inside a buffer region.
    goal_state = is_dehumidifier_on
    if humidity <= 55: goal_state=False if humidity >= 60:
      goal_state = True

    # We also want to disable the humidifier any time the TV is
    # running or the pgeRate is part / peak, re-enabling when
    # that is no longer the case.
    if is_tv_on:
      goal_state = False
    if pge_rate == "peak" or pge_rate == "partialpeak":
      goal_state = False

    if goal_state == False:
      self.turn_off("switch.dehumidifier")
    if goal_state == True:
      self.turn_on("switch.dehumidifier")
The structure I use is probably not optimal. I have one function
(UpdateState) that grabs the relevant states, computes stuff, and then
calls services. I call this function on startup and I also configure
callbacks for all of the sensors that call this function on any change. I
could do more with the callback event logic, but this works fine.
Many of the inputs are actually outputs from other AppDaemaon scripts. For
example, "sensor.pge_rate" is computed in another AppDaemaon script from
the current time and is reused in several other scripts.
AppDaemaon supports logging statements, automatic reloads whenever the
file changes, and even has a test
framework, which is sorely missing from other options. It's
well documented.
Each python class or "App" runs in it's own pinned thread unless otherwise
requested. It can use persistent storage and communicate with other apps.
Each thread is isolated, so a crash just restarts it and doesn't affect
the other apps or AppDaemaon. I haven't yet coded an infinite loop, so I
don't know what happens if a thread blocks, but I'd be surprised if that
doesn't degrade gracefully.
AppDaemaon also runs an admin web server that shows you all sorts of
state, such as all of the registered callbacks, running threads, etc. It's
super barebones, but quite functional. It's very ugly, which gave
me the initial impression that the add-on is perhaps not very mature, but
that's definitely not the case.
I only have two complaints: logs are immediately discarded if you don't
have the logging window open in the browser. The web server runs on it's
own port, doesn't integrate into HA's auth, and so is inaccessible from
the internet because the web server is completely unauthenticated.
When just getting started, I found this
short article on AppDaemaon to be a great hello world. That said, I didn't
initially understand all of the entity / state / attribute / service
concepts above, and I'd strongly recommend understanding those before
getting too far.
]]>Lighting my roof with WS2815 LEDs2021-03-06T00:00:00Zhttps://gregable.com/2021/03/ws2815-lights.htmlWhat I learned while installing WS815 strip lighting on my roof
Any-Holiday Lights
I recently finished the project you can see looping in the poor quality
video above. I installed strip LED lights under the gutter on the roof of
my house. I plan to use this for holidays and holiday seasons like
Halloween and Christmas.
Each light in the strip is individually addressable, meaning that I can
control the color for each light separately from software. This means that
I can set up different color schemes for different holidays, all without
having to hang up or swap out lights. Purple and orange for Halloween. Red
and Green for Christmas, even Red, White and Blue for 4th of July or other
shorter holidays.
The strip is also unnoticeable when unlit, even during the day. This means
I can leave the lights up year round making my "decorating" as simple as
flipping a switch.
The whole system can be turned on / off and the colors or patterns
selected from my smart phone. The ultimate in engineered laziness.
Basics
If you are interested in implementing something like this, read on. There
are actually quite a few good resources on the internet besides this post
worth reading too, but I ended up coming up with solutions to several
problems that weren't as well discussed on the internet. Reading this may
save you some time or at least give you an idea of how to proceed.
First, a parts list for what I ended up using:
WS2815 12V RGB
LED Strips: These are the actual lights in a water resistant form.
I'll talk more about them
later. Each of these strips is 5 meters long, so in my case I needed
around 2.5 strips for the width of my roofline.
Aluminum LED
Channels: These get directly mounted to your roofline and the LED
lights are run inside of them. They aren't waterproof, though they
provide some protection from water and damage in general. They also come
with a light diffuser which makes the LEDs a little less of a point
source of light.
Dig-Uno
board: For most people, this is much simpler than buying the
electronic component parts you'll need for this. This board is
responsible
for emitting the right wire signal to light the LEDs. It has an onboard
WiFi chip and broadcasts an HTTP server running WLED for easy control of
the
lights from a web browser. It also handles the 12V/5V changes for the
logic board, includes a fuse for safety, and a few other features.
10A 12V DC
Power
Supply: You'll use this to convert mains power to DC power for
the rest of the circuit.
5.5x2.5mm
female
power adaptor: The screw terminals that came with the above Power
Supply were not rated at 10A and will catch fire if you have too much
power running through them. Ask me how I know:
Temperature of the screw terminal
that came with the power supply after about one minute.
16 AWG
triplex
wire: I used this wire to get power and signal from my power
supply and dig-uno up to the roofline. It's overrated for the power
draw,
but seemed likely to last a while and the higher guage would present
less
internal wire resistance over a long run.
Some paired 22AWG wire and 18AWG wire. You'll only need a few feet of
the
22AWG. For the 18AWG, you'll want roughly the length of your LED strip.
Liquid
Electrical Tape: In a few places, you'll need to peel back the
waterproofing on the LED lights, and I felt this provided the best way
to
re-seal those points to prevent water intrusion.
Medium
SOCKiTBox: or other waterproof project box to keep the electronics
dry.
3 Wire
waterproof connector: You could solder directly, but this makes
the
whole system easier to maintain and set up.
Various tools: This involves soldering, mounting into wood, etc.
I'm not going to go into the options here. There are plenty of other
guides for this.
Basic idea: Mains power -> DC Power Supply -> Dig-uno -> LED strip. All
housed within the project box or aluminum track.
The LED strip has 2x data lines, and positive / negative lines. The first
LED chip recieves a data line signal and displays the first color in the
sequence.
It then removes the first color in the sequence and sends the truncated
signal to the next light and so on. You can cut the strip
anywhere and the whole thing keeps working. You can also solder the end of
one strip to the start of another strip to lengthen them. The data signal
can accomodate any number of lights at the cost of a slower refresh rate.
I have 400 LEDs with no problem.
The big advantage of WS2815 is the backup data line. If a single LED dies,
the signal gets passed to the next one in the line. Each chip gets a data
signal from both the LED 1 before and 2 before. If both signals are
present, it uses the 1 before line, otherwise it uses the 2 before line.
Problems
The main issue from this setup is voltage drop along the strip of lights.
You'll find a lot of information about this issue, but the basic idea is
that as the positive/negative lines get longer, they create internal
resistance and the voltage between them slowly drops. The consequences of
this are that the LEDs get less power further down the strip, which messes
up their color. The other issue is that the strips themselves can heat up
and potentially melt / catch fire.
According to this manufacturer, each meter of this strip at max brightness
uses 7.2W ofpower. I have a 13 meter wide roof, which will theoretically
pull as high as 7.2W/m x 13m = 93.6W.
The manufacturer isn't clear on exactly how much power is safe to run
through the strip but seemed to suggest that powering one strip from only
one side was safe. So 36 W was OK, but maybe not 94W. I tried it anyway
for a short time and it actually seemed to work fine, but it did get
pretty warm.
As a side note, I originally tried 5V strips instead of 12V. This makes
the voltage drop issue much worse. I'll always go straight for a
12V option in the future.
To fix the voltage drop issue, I ran a 18AWG wire pair down the length of
the track and
soldered it to the strips at the start, 5m point, and 10m point. I also
put a 7.5A fuse in the dig-uno so that I know it would trip well before
the DC power supply got overloaded in the case of a short. 7.5A x 12V =
90W. In theory, the strip might draw more than this and burn the fuse,
but as long as I don't decide to use pure-white at 100% brightness, I
should be fine.
The 18AWG cable should only really carry current for the 2nd and 3rd strip
in the sequence, so we'd expect it to carry only about 4.5A max. Looking
up ampacity tables, a smaller 22 AWG should work too, but if the wiring to
the first strip fails, the cable could suddenly start carrying up to the
full fused 7.5A, so 18AWG it is. Overkill is underrated.
At each solder connection, I used a layer of the liquid electrical tape,
covered in a layer of heat shrink tubing. Inside the aluminum track, this
should hopefully hold up against water for a decent amount of time. I also
have the luck of a northern facing front porch with a lot of tree shade,
so UV shouldn't be too bad either.
Liquid Electrical Tape drying before the heat shrink tubing.
Final Result
Once set up, the WLED controller runs a small web server that I can
connect directly to over WiFi. I can schedule times for light displays to
turn on and off, select color palettes and interesting patterns, and do
all of this without ever having to get on a ladder again!
Update Dec 2021: I've been very happy with this, having run it for all
sorts of
different holidays. Yes, Halloween and Christmas, but also Valentines, St.
Patricks, New Years, 4th of July and Memorial Day. I'm looking forward to
hooking the lights up to home automation to illuminate the as I pull into
the driveway! So far, it's been almost a year and I have had no problems
with the lights running.
]]>Hiking Quieter Trails2021-01-16T00:00:00Zhttps://gregable.com/2021/01/covid-hiking.htmlBay Area Trails I've been exploring during CovidSweeping vistas of the Pacific along Baldwin Loop Trail
Beginning last fall, I've been exploring day hike trails near me that I've
never been to before. My intent was to explore trails that were a little
more off the beaten path because of Covid concerns, and close to San Jose.
Most of these I could reach with my 2015 Nissan Leaf that only has a range
of about 50 miles. These trails also worked well with the cool dry weather
we've been having in the area. Many have lots of sun exposure or would be
muddy after rainfall. The following is the short list of some of those
hikes that I've done lately which I'd recommend.
This was probably my favorite listed here. The start of the trail on the
Baldwin loop climbs from Hwy 1 up onto an exposed ridgeline with sweeping
views of the Pacific Ocean. We traversed this trail clockwise, and I think
that gives a little bit longer of a view as you return to your car facing
the ocean. It also makes the short maximum grade sections uphill.
Once you reach the intersection with the Enchanted Loop trail, you can
choose to cut your hike short, making it a simple 3.2 mile loop with
moderate 600ft elevation gain. However, I would strongly recommend adding
on another 1.9 miles for the Enchanted Loop trail which is fairly level
except for a few short sections.
The Enchanted Loop trail has an entirely different character to the
section you will have traversed so far. Up until now, you've been walking
along grassy hills with sweeping views. Immediately after starting on the
Enchanted Loop, you drop down the inland side of the ridge into a fairly
dense Redwood and Oak forest. The trail mostly meanders through a dark
valley. We saw fairly few others along this section, which made it rather
tranquil. One person we ran into was foraging some mushrooms from the side
of a tree trunk.
The furthest east section of the trail had some brush that appeared
recently burned from the fires in the area, but the trail was not impacted
in any way and was easy to follow.
The trailhead was not well marked, though it wasn't hard to find or
navigate. You have to park in an unmarked dirt
parking lot off the side of Hwy 1 and then cross by foot and walk a
short distance down what looks like a private road. The parking lot is not
signed for Wilder Ranch, which has it's own parking lot to the South. I
recommend making sure you have the parking lot dialed into a GPS before
you get there.
This one is a very flat stroll in Joseph D. Grand County Park. I've
driven past this several times on the way up to Mt Hamilton, but never
stopped. Nor do many others it seems.
The trail is a leisurely 4mi loop around the edges of an open meadow
with an old abandoned barn sitting in the middle. It's a rather
picturesque landscape. There are a good number of massive live oak
trees dotted along the trail. Due to it's location and lack of visitors,
we saw quite a lot of wildlife along the trail. Quail, Deer, Turkey, and
even some wild pigs in the bushes. I didn't get a good look at the
pigs. We heard them before we spotted them.
Despite the beautiful trees, this is mostly an exposed trail and would be
hot in the summer. Some parts also run over fairly low points in the
meadow, so I imagine that it could get muddy after a good rain.
I did walk
past some of the trail intersections at
a few points, and my GPS started beeping at me. There was some signage, so
I'm not sure if I was just absent minded that day or it was hard to spot.
I don't think it would be possible to get seriously lost though.
My planned route was a leisurly short loop starting from the parking lot
without much elevation. In total, I think it's around 400ft of elevation
gain over 3 miles, with broken up short moderate grades. Route:
Start at the parking
lot in Calero County Park. Head down Oak Cove trail,
climbing
<100ft over 0.2 miles.
Turn left onto the Figueroa trail. This section is cooler as it
follows a creek and has lots of shade. Climbs unnoticeably 150ft over
1.5mi.
Turn right onto the Vallecito trail which climbs 150ft along a
single
track for 0.5 miles.
Turn right onto the Pena trail which climbs 100ft to a hilltop
with a nice view and a good shady spot to have a snack or packed lunch.
This is followed by a moderate descent of about 300ft. Overall, about
0.25 miles.
Turn right back onto the Oak Cove trail to head back to the
parking lot. There is a small ridge you have to climb up, about 100ft,
and the rest is a descent. 0.5 miles back to the parking lot.
This wasn't particularly memorable, but it was a decent trail with some
mild highlights, and a short drive. If I were to return, I would bring
lunch to sit on the rocks under the live oaks at the top of the hill on
Pena trail.
This trail is a bit different than the other three. It is very
popular, but due to limited parking it's not packed. Since the trail is as
wide as a highway it's pretty easy to socially distance.
Devil's slide is actually an old section of Hwy 1, and you will be walking
along a paved highway road. This section of Hwy 1 was frequently needing
repairs due to the sheer cliffside it's carved into. In 2013, it was
replaced with a tunnel and cars were no longer able to drive along it. At
that time it was converted into a multi-use trail.
This is a short, 2.5 mile out and back along a paved road. Usually I
wouldn't have any interest in that kind of thing, but the location is
incredibly scenic and rather unique. See some of the photos and video on
HikingProject to get an idea of what you are in for.
As I mentioned above, the parking is very limited. There are parking lots
on both ends, but I found them to be both completely full with a line of
cars waiting for an empty spot. I waited about 30 minutes for a spot to
open up, but it was worth the wait. I would recommend against trying to
park cars on both ends to do this hike one-way. The logistics are just too
annoying and the hike is rather short. You could always go out and back a
shorter section if you wanted to and still see the views.
]]>SVG Airport Diagrams2019-08-24T00:00:00Zhttps://gregable.com/2019/08/svg-airports.htmlAfternoon coding project to generate airport diagrams using web components.I've been working on my Private Pilot license. As part of training, I've
been flying to different airports in the area. I also practice diversions, which
are unplanned visits to an airport in a simulated emergency.
When approaching an airport, it's important to know the layouts of the
various runways in relation to each other and their patterns. I am very visual
when flying, so an airport diagram helps me more than text descriptions,
especially with landing pattern indicators overlayed.
On my first cross-countries, I drew a few of these by hand, but for local
flight, I thought it would be fun to code something up to make it eisier to do.
Enter SVG Airports which
can produce images like the following embedded within a web page:
Sample airport SVG for Tracy (KTCY) Airport
You can also use it, like I have, to generate cheat sheets for all of the
airports in an area. See this one for the San Francisco Bay Area Airports
To use SVG airports, simply add to the bottom of your page:
This supports adding as many runways as you would like in the same diagram,
custom labels like "7R", etc. To see more documentation on the parameters,
check out the
README on GitHub.
The code is licensed via an MIT license as free to use however you would like. If you found a good use for it, drop me an
email and let me know.
]]>Building an igloo near Lake Tahoe2018-03-08T00:00:00Zhttps://gregable.com/2018/03/tahoe-igloo.htmlTrip report from my first attempt at igloo building near South Lake TahoeFor some time, I've wanted to build an igloo. I'm sure I'm no different from
you in this regard. This winter, I gave it an actual try. I failed, but
the fun is in trying.
Cresting the ridge on the way to Meiss Meadows
Winter hadn't give us much snow this year in the western Sierras, but in
early March, we had a major dump which in a couple days put more snow on the
mountains than there had been all year up until that point. Game on!
Snoeshoes on, packs loaded. The plan was to build a 9ft diameter igloo
and sleep in it overnight. None of us had ever done this, but I had bought
this igloo form tool
:
It's a tool for packing the igloo blocks in place. The form is at the
end of a telescoping pole that adjusts as each layer of the igloo goes in place.
Essentially, you spiral around until you get to the top, packing snow in as you go forming a wall.
The plan was to get an early start by driving up and sleeping at a nearby resort for the night. With luck, we'd have most of the day to build an igloo, which
should be more than enough. Best laid plans and all that, but we got into the room the night before *much* later than planned and got a less than alpine start in the morning, giving us less time than we had hoped. Also, the hike into our location took a bit of time. We only started our igloo after lunch.
We did made progress. I think we got the walls roughly 4 ft tall before the
sun settled in behind the ridge and we needed to stop for the day.
Time lapse of igloo going up.
We still planned to spend the night, and we had a backup tent for this purpose. However, it was quite windy and we did not have any snow stakes for the tent, so we decided to set up the tent inside the igloo wall for some extra support. to do so, we needed to knock out a corner of the igloo for the tent to stick out a bit. Here's a photo in the morning light of what we had after the tent was removed.
In our case, we decided to build our igloo in Meiss Meadows near Lake Tahoe.
The area is technically available for backpack camping as is follows allong the
Pacific Crest Trail. It also enjoys easy access from one of California's Sno
Parks. Sno Parks themselves are little more than parking lots that are kept
plowed in the winter. You aren't really allowed to camp in them, but you can
park there overnight for some reason. However, if you hike in a bit from the
parking lot into Meiss Meadows, you can camp there. At that point you are
technically on the Pacific Crest trail, which allows wilderness camping.
The other nice part about this area is it is right down the street from
Kirkwood ski resort. So, we spent the night before our adventure in Kirkwood for
a fresh start. Things didn't really work out that way, but that was the plan at
least.
]]>Indexed Annuities - Anatomy of a financial scam2017-10-20T00:00:00Zhttps://gregable.com/2017/10/indexed-annuity.htmlA detailed look into an equity-indexed annuity.A year ago, I got a look at a financial product being offered primarily to
seniors. It came with the recommendation to put all of their retirement
savings into it. The product was called an "equity-indexed annuity" (aka "fixed index annuity").
The marketing sounds great
The company selling this was Global Atlantic Financial Group, but there are
lots of these. All of these products are losers for the investor, regardless of
the company.
Here are some plans from their marketing brochure:
"Upside potential with downside market protection"
What they are suggesting is:
Stock market goes up: your investment goes up approx the same amount.
Stock market goes down: your investement is unaffected.
The marketing then explains how this isn't a free lunch and there is a minor
tradeoff involved where you don't get the full market upside. Possible ways
this is structured include:
The market upside is capped at a certain amount per year
The market upside is reduced by a certain percentage (a spread).
If the growth is less than some amount, you get no upside.
Some combination of these and other clever schemes.
I'm guessing this tradeoff is pointed out in marketing materials because
their customers know that a free lunch means a scam. By showing one of the
less significant downsides, it disables people's scam detectors.
Lastly, there is even a fixed-rate plan that sounds like a savings account,
but it's still an annuity. Take a look:
Neither the website nor the brochure has any real details. Perhaps that's
because I simply haven't yet shown you the image of the brochure that explains
everything:
If you don't know what an index is, you might not be in for a fair fight.
There is also a page of fine print that is essentially a liability waiver,
but even with that, critical components of how this works are completely
missing:
What number is the cap percentage?
What number is the spread percentage?
How is the market growth calculated?
What is the guaranteed minimum interest rate?
What is the initial fixed interest rate?
How is interest compounded?
How often can the interest, cap, and spread numbers be modified?
What fees are charged?
What are the early-surrender penalties?
What happens if I die?
Don't look behind the curtain
There are lots of knobs here that affect the performance of these products.
The more knobs, the more ways exist for the customer to be fleeced. Lets look
at some of the tricks of the trade.
"Fixed" Interest Rate
This plan sounds much like a savings account at a bank, and should feel
familiar. The salesperson will probably ask what interest rate your bank gets:
"Oh, it's only 0.34%" and will then explain that this interest rate is
currently 0.4% or something along those lines. Sounds great.
Unfortunately, that could be a teaser rate. Maybe the actual rate drops much lower after a few months. Who knows? When I looked into the "minimum guaranteed rate" on this fund, the minimum was actually 0.0%. It's unclear what this "minimum guaranteed rate" actually guarantees.
There are also outright lies. In the brochure, it is mentioned that both
"interest is credited consistently" and "crediting is daily", meaningless
phrases. What you are supposed to confuse this with is "interest is compounded continuously" or "compounding is daily", which have a specific meaning that is
regulated.
The frequency of compounding affects how much money you get. Compounding
more frequently gives you more money. Consider $1,000 invested at a 5%
interest rate for 1 year, with different compounding rates:
Compounding frequency
Interest after 1 year
(aka APY)
Annual
$50
Monthly
$50.63
Daily
$51.27
You think you are getting daily compounding, or better, but you are
getting the annual rate. A bank savings account is regulated so that they must
tell you the effective APY (Annual Percentage Yield) which is the rate over
1 year, regardless of which compounding method is used. An annuity has no
such regulation imposed on them, so they use terms like "crediting is daily".
This makes comparing to your bank's interest rate an apples-to-oranges
comparison.
FDIC Insurance
Remember that little thing called FDIC Insurance? This is where, if a
bank goes bankrupt, your savings account is safe and insured by the federal
government. Annuities are not FDIC insured. If the annuity company loses money,
you might not get yours back.
Let's start with the dividend lie of omission. Market returns are measured
in both the increase in value of the stock and dividends. Dividends,
which are always positive, get left out from all of these fund calculations.
Any dividends recieved from investing your money are kept by Global Atlantic.
You would be getting those in a Mutual Fund. The S&P index historically has
an median annual 11% return and 3% dividends. Even ignoring spreads and caps,
you are missing out on dividends, which go straight to the fund owner's pocket.
The spread or cap number makes a ton of the difference. Why is this number
not in the brochure? It's literally the most critical bit of information.
That's insane.
Here is a pdf I found showing the actual spread, cap, and interest rates for some of these funds, at the start of 2017. The PDF states "Not for use with the public" as the rates you are agreeing to are apparently a secret. I don't know for certain that these rates are accurate, but I have no reason to suspect otherwise.
For the 'Capped' plan, They cap your earnings at 4.25% per year. For a 'Spread' plan, they keep the first 3.5% of your earnings per year before you see a penny.
If you are confused, and aren't able to tell if that's a lot or a little,
that's the whole point. I'll try to explain with some historical data.
If you look at the S&P median annual returns, you see that a typical year has 14.31% returns. In such a year, $1,000 invested would look like:
S&P mutual fund would grow by $143.10
4.25% capped fund would grow by $42.50
3.5% spread fund would grow by $108.10
This is a hypothetical example, but we can simulate these 3 funds fund types
in all years of the S&P with a
small spreadsheet.
Columns E and H show the returns that the Annuity would have had above and beyond the S&P if invested on Jan 1 of that year and kept for 1 and 3 years respectively. Green cells are years where the annuity had better returns, red cells where the S&P did btter, and the number in the cell shows by how much one did better than the other. Not a lot of green.
Over 1 year periods the S&P averaged 11.74% return, and the 1-year Capped annuity averaged 2.86% return. If you invested $1,000 in both for 6 such years, you would have made about $760 more with the S&P than the annuity.
Over 3 year periods, the S&P averaged 38.93% returns while the 3-year spread annuity averaged 22.31% return. If you invested $1,000 in both for 6 such years, you would have made about $440 more with the S&P than the annuity.
You can see how the dividend theft, combined with high fees in the form of caps and spreads, mean most of the market return goes to the annuity company and not you the investor.
You might agree but still argue that you may need access to my money in a short term, and in that case the "no downside risk" is worth the very high cost of some of the upside. You would almost certainly still be wrong because of early surrender.
Early Surrender
Not mentioned anywhere in the brochure, there is a clause in your annuity contract that states that there are penalties for taking money out of your annuity early. How early is too early? The answer is typically any time within 10 years of purchasing the annuity.
Don't believe me? Take a look at this Multiple Annuity Rates PDF. The Global Atlantic rates are on page 7, but you can look at a bunch of companies here. See the section labelled "Surrender Charges" with the text below that reads "(10 Year) 10 - 10 - 9 - 9 - 8 - 7 - 6 - 5 - 4 - 2 - 0". What this text tells you is the fee that will be charged if you choose to cash out your annuity in each of the years after opening it. In the first 2 year's it's 10%, in the next 2 years it's 9%, etc:
Years after Opening
1
2
3
4
5
6
7
8
9
10
11+
Fee
10%
10%
9%
9%
8%
7%
6%
5%
4%
2%
0%
This means that if you buy this annuity and expect to be able to take money out when you need it, in the short term, you will be losing as much as 10% of your investment right off the top. Not 10% of the earnings, but 10% of your entire investment. $100 of every $1,000. Years of your life savings.
Many of the funds have even worse surrender fees than this one, even as high
as 20%!
So, because of the ongoing fees (spreads and caps) you lose more and more money the longer you've invested. And because of the early surrender fees, you lose more money the shorter you've invested. Fleeced either way.
Commissions
The moment you sign over your retirement savings to an annuity provider,
without telling you, they immediately take about 10% of your hard-earned money for themselves. Then, every year, they also take over half of the growth you should have earned in the market. They never tell you this, you don't get billed, it's just that your earnings are that much lower and you pay when you want the money back in early surrender.
If you aren't convinced, take a look at this Schedule of Commissions PDF, on page 2. This shows the commisions paid to the "financial advisor" who sold you this annuity. Depending
on your age and which "Fixed-Indexed Annuity Product" you were sold, they will
get as much as 8% of your money as a commission "at issue", and another 1% or
so of your money every year ("annual trail") that your money stays invested in
the fund. That's just the salesperson's commission, not what the actual company
is making in profit.
It gets uglier. See this Bonus Commission PDF for the salespeople, which reads "The more you brew, the
more you accure. ... Enjoy the bold flavor of 7% commissions plus an additional
sweetener - incentive compensation based on annual production." with pictures
showing up to an extra 2% commission for selling over $3 million dollars in
annuities in a year. I hope that "additional sweetener" helps them swallow the
guilt from the theft of other's retirement savings.
For many people, this commission represents literal years of their life of saving money.
Many of these salespeople will introduce themselves as a financial advisor. This sounds like they are on your side. It sounds official, like "certified electrician", and you might expect they have certifications and are regulated. They might, but they don't have to be. The term Financial Advisor has no legal meaning.
Worse, annuities aren't regulated like investment funds. Normally, something
like this wouls be regulated by the Securities and Exchange Commission (SEC).
However, despite the fact that they are marketed just like Mutual Funds, they
are considered "insurance products" and are thus not under the Jurisdiction of
the SEC. For the most part, individual states must regulate these, and few are
equipped to do a very good job.
This industry makes $17 Billion profit per year from families retirement savings, and lobbies hard to remain unregulated to keep this money flowing.
In 2016, the Department of Labor, under Obama, put forth a new rule that
would require a financial services company to disclose their commissions and
have a "fiduciary responsibilty" to their clients. A fiduciary responsibility
means that by law, they must recommend investments that are best for their
client's financial interest (rather than best for commissions). If they fail
to do so, they can then be taken to court. In addition, annuity vendors will
have to disclose their commissions to clients.
The financial industry fought back hard, including awful ads like these:
Plot twist: Anne is actually stealing the college fund.
Obama's Department of Labor caved a little and delayed implementation of the
rule to June 2017.
A very early priority of President Trump, Trump signed a memorandum less than 2 weeks after taking office that instructed the Department of Labor to delay the rule by an additional 6 months. A few
days later, he appointed Department of Labor Secretary Alexander Acosta to
make sure this got implemented.
The Department of Labor in March began a 15-day public comment period on
these delays, during which they recieved about 193,000 comment letters, with
nearly 178,000 opposing the delay. After the comment period, they recommended a
2 year delay until June 2019, which was approved by the White House in
August 2017.
It is reasonable to imagine that the current administration will continue to delay or weaken this rule rather than allow it to take place in 2019.
]]>Sierra Jewels2017-08-06T00:00:00Zhttps://gregable.com/2017/08/sierra-jewels.htmlTrip report from hike along the PCT and JMT starting at Agnew Meadows trailhead near Mammoth.Heading into the mountains along the shadow creek trail.
I was looking for a backpacking in trip early September. A buddy of mine
who is also a private pilot suggested flying into Mammoth in a private plane
and looking for something around there. Typically that area is quite a drive
from the bay area, often requiring driving south around the Sierras due to
fairly limited numbers of passes, which are often closed to snow. Flying in
added to the cost a bit, but made it possible schedule-wise. It also meant some really nice views, like this shot of a large forest fire in Yosemite.
Unfortunately, we hadn't planned ahead much and this is a very popular area with trailhead quotas. It's also the first restock stop along the popular John Muir trail after leaving Yosemite, so it's a busy area. Still, it's busy for a good reason as it's gorgeous. However, we had to walk into the NPS and hope for a same day trail quota slot. Our plans were flexible, but we got roughly our first pick: A hike that day out of Agnew Meadows trailhead.
Our route took us along Shadow Creek trail North to the intersection with
the John Muir trail. It followed the John Muir trail past 4 lakes (Garnet,
Ruby, Emerald, and Thousand Island Lake) to intersect with the Pacific Crest
trail. The gemstone lakes are the source of the name of this post. From there,
we looped back along the Pacific Crest Trail, which is also known as the
High Trail along most of this section. We also took a brief detour
out and back along the Shadow Creek trail to see Ediza Lake.
Still lots of snow and water even in August
Due to a record snowpack last winter, conditions were still quite wet, even
though we were in September. Some of the roads had opened only a few weeks
earlier. We mostly stayed below 10,000 ft, so only small patches of snow in a
few places. The waterfalls and creeks were overflowing, which was awesome to
see. On the downside, there were a few muddy trails and an overabundance of
mosquitos everywhere. The mosquitos only subsided when it got too cold at night for them to fly, or when it was raining.
My favorite spot along the trail was probably our side trip for lunch on
Lake Ediza. The bridge had washed out to make the approach a bit of a minor
scramble. The views were definitely amazing, with the snow covered Minarets
setting the backdrop of the lake.
I tried out a new camera for this trip, the DSC-RX100M3. Usually I either
take a bulky DSLR or a cell phone. The DSLR has the problem of bulk and weight
as well as my fear of pulling it out in adverse conditions like rain. I also
can't wear it anywhere with convenient access. The cell phone is light, but
the battery doesn't typically survive. In order to keep it running, I turn it
on and off between photos, which takes too long. This little compact camera was
convenient and took decent photos as you can see. I didn't know it was
timestamping every image though, which ruined a few of these a bit. I've since
fixed this setting.
Brisk morning breakfast Sunset on the return trip.
]]>Mt Kosciuszko Summit2017-04-29T00:00:00Zhttps://gregable.com/2017/04/mt-kosciuszko.htmlTrip report from summiting Mt Kosciuszko, the tallest peak in Australia.I was in Australia recently and met up with my cousin Jeannie. Since I had
summited Mt Kilimanjaro in
2010, I wanted to add to the list of the
Seven Summits that
I had climbed, which are the highest point on each of the seven continents. While I'm unlikely to attempt most of them, Australia's Mt Kosciuszko is the easiest by far and I was going to be within a few hours drive.
My cousin Jeannie and I at the summit marker on Mt Kosciuszko.
The top of Mt Kosciuszko, or 'Koszi' as the locals call it, is only 7,310 ft (2,228 m). The hike itself involves climbing 1,200 ft (360m) over 4.2 miles (6.8 km), and then back down again. The area is a very nice alpine meadow type of terrain, with gorgeous little streams crisscrossing the landscape
Various photos along the path to Kosciuszko
The terrain seems a fairly fragile ecosystem, at least at the time of year
I was up there. There was a lot of wonderful vegetation unspoiled by folks
walking over it everywhere. With the surface soft from snowmelt, trails would
have quickly turned muddy in many areas from the large number of hikers. I was
happy that the NSW Park Service had built a raised walking path to protect it.
As with many of the seven summits, this is not a location with much chance
for solitude. There were probably a few hundred folks along the trail, but it
also didn't feel crowded either, despite excellent weather.
Excellent hike and day, and thanks to Jeannie for joining me.
If you are interested in hiking Mt Koscuiszko, you will first need to make
your way down to the town of Thredbo in New South Wales. It's about a 5 hour
drive from Sydney and a 6.5 hour drive from Melbourne. However, I'd plan on
having the day to do some exploration along the way as it's a pretty area. We
explored some of Australia's hydro power dams along the way to Thredbo,
stopping at the Blowering reservoir. We then drove back along the coast,
stopping for some snorkeling along the way.
The time of the year matters. It's not recommended to hike in the Australian winter, unless you have experience with snow fields and navigation. This means
that most folks will not hike between approximately June - October.
Once you arrive in the area, there are multiple ways to the top. The easiest
involves a chairlift from the Thredbo resort and then a 6.4km hike to the top. There is an alternative longer route along Charlotte's pass which was once a
driving road.
Despite it being a fairly small mountain for most folks interested in peaks,
it is a very enjoyable hike with gorgeous views and well maintained trails.
]]>Social Security Tools2017-01-07T00:00:00Zhttps://gregable.com/2017/01/social-security-tools.htmlOver the holiday break, I build a small website that generates a report detailing a person's social security benefit.Over the holidays, I spent some time finishing up a website that I've
been
building which helps anyone to understand their United States Social
Security
benefits. I just launched it over at
Social Security Calculator.
Screenshot of https://ssa.tools/
It's still a work in progress, but it's usable. It lets you see your own
benefit information, shows you the calculations that take you from your
earnings
records to your benefit amount, and lets you run "What - If" scenarios
with
different inputs:
What if I worked for 6 more years?
What if my earnings increase by 10%?
How much less will my benefit be if I start early?
How much more will my benefit be if I delay?
I've tried to not just show the result of the calculation, but show how
the
calculation is made, so that the user can get an intuitive feel. Charts
that
show you the answer to some of the above questions on a curve hopefully
help
to give a sense of what these calculations are doing.
I'd like to add some more features to the tool including:
Demonstrating how actuarial tables predict how much you'd get by
starting
benefits at different years.
Computation of spousal benefits.
Toggle viewing benefits amounts as monthly or yearly.
Compute the amount of payroll taxes paid over your lifetime to compare
with the potential benefits you recieve.
Additional language support, which I would need help with.
Fix a bunch of rendering issues on small screens (mobile).
The site is entirely static. I did not want any personal data someone
enters
to need to make a round trip to a server, to protect privacy. That means a
lot
of JavaScript. While relatively small for some folks, it's probably the
largest
amount of JavaScript I've put into a web page before, so it was a fun
learning experince. It's ultimately hosted on Amazon's S3 and then
delivered by
Cloudflare, just like this blog.
If you spot any issues or have suggestions, please add them over at the
issue
tracker on GitHub.
]]>Yukon River Canoeing2016-08-28T00:00:00Zhttps://gregable.com/2016/08/yukon-river-canoeing.html8 day canoe trip report from the mighty Yukon river in Canada. Abandoned steamboats, grizzly tracks, northern lights, fly fishing, lake storms, and lots of fun.The shore of Lake Laberge.
I just returned from an eight day excursion on the Yukon River in canoes, camping along the shore every night. This was an excellent follow up to my similar trip canoeing the Green River in Utah last summer. The basic idea was the same: float and paddle downstream on a large river, camping alongside the river every night. The terrain and many of the details were very different than the Green.
Our route started in Whitehorse, Yukon Territory, Canada and flowed downstream (North) to Carmacks. Had more time been available, I would have liked to extend the trip to float onwards to Dawson, but that will need to be another time. The river continues some 3,000 km farther into Alaska and eventually to the Pacific Ocean.
Lake Laberge
Most of the river is moving pretty fast on its own, but there is a 60 km section of the river just at the beginning where the river widens out into a lake with no current. The lake is named Lake Laberge. Despite it accounting for about 20% of the distance, it took our group about half of our time to cross.
The lack of current and slow going is only one issue with the lake. Wind can also pick up and create waves higher than the sides of your boat. These can cause a canoe to be quickly swamped. The waters are cold enough that this is potentially life-threatening, so when the wind picks up, you get to the shore and wait it out. On one of our days, we only had about 3 hours where we could make progress. Some folks wait out storms for days.
The other downside of the lake is that it offers less solitude. Whitehorse is a starting point for a lot of people, since it has a large airport and there is a dam just upstream. With everyone starting on the same spot and slow progress early on the trip, folks are a bit bunched up until they get off the lake. We had competition for good campsites and could often see another party or two on the lake while paddling. I'd recommend starting the trip during the week to reduce this effect a bit, or pick a different starting point such as Carmacks. On the plus side, we did run into an incredible group from Tennesee in a homemade viking boat.
Past the lake
Lake Laberge was pretty, but very tiring. Once we finally got back on the river though, things improved greatly. Based on our crude estimates, we could float somewhere around 8-10 km / hr with only very rarely paddling for a couple minutes to avoid some river feature or another.
The river had a number of interesting historical areas to explore, more than we had the time for, but we picked a few of them. Probably the most interesting one was an old steamboat, the S.S. Evelyn/Norcom which was resting upon an island, which used to be an old shipyard.
SS Evelyn / Norcom abandoned on shipyard island.
In addition to the steamboat, there were cemeteries, ghost towns, logging camps, log cabins, gold dredges, and probably a lot more that we missed!
The night sky
Due to some strange 'feeling' that a paper thin layer of nylon tenting material was somehow protecting them from grizzly bears, most of my group slept in tents every night. On nights where the weather looked pretty safe, I just rolled out my sleeping bag under the stars and it was glorious.
Every time I woke up, I got a planetarium-style view of the night sky. It never would get pitch dark due to the summer sun at that latitude, but without city lights it was still quite nice. Even got to see some good shows of Northern Lights (Aurora Borealis), though I didn't have the camera equipment necessary to capture them well.
Hand-tripod'ed long exposure of the Northern Lights.
Logistics
If you are interested in this trip, it's very doable for someone with good backcountry camping experience. The canoeing is pretty simple and you can learn quickly. The camping is where all of the complexity comes in, if there is much. One of my group made a different writeup that focused more on logistics than mine which you can check out on his blog: [JeremyShapiro.com]. If you are thinking about this trip and have any questions, feel free to shoot me an email too.
]]>Regular Expression Crossword Puzzle2015-12-22T00:00:00Zhttps://gregable.com/2015/12/regular-expression-crossword-puzzle.htmlA crossword puzzle designed for geeks, every single clue is a regular expression.If you know regular expressions, you might find this to be geek fun. A
friend of mine posted this, without a solution, but once I started working it,
it seemed put together well enough it was likely solvable. Eventually I did
solve it, but not before
coding up a web interface for making it easier to interact with,
which I recommend using if you are going to try this out. Or just print it out.
Click to try your hand at solving
It's actually quite impressive of a puzzle in it's own right. It must have
taken a lot of work to create. I learned later that the puzzle was originally
part of the
2013 MIT Mystery Puzzle Hunt
created by Dan Gulotta from an idea by Palmer Mebane. I've heard amazing things
about these events, this doesn't surprise me.
My puzzle web interface was also a bit of fun to smash together. I wanted
the puzzle to be rotatable, but for the input boxes to stay upright through the
rotation. I also wanted the browser to verify the regexps for me as I went
along. Getting the hex cells to work in CSS took a bit of doing, and I admit
it's not very cleanly done.
Code has been uploaded to github if anyone wants to play with it:
Gregable/regexp-puzzle
]]>Elkhorn Slough Kayaking Trip2015-08-11T00:00:00Zhttps://gregable.com/2015/08/elkhorn-slough-kayak-trip.htmlElkhorn Slough in Northern CA is the best place in the world to check out otters. Trip report and description of how you can visit.Otter floating lazily in Elkhorn Slough.
A few weekends ago, I went down to kayak in Elkhorn Slough. I've probably
kayaked this area about half a dozen times in total since moving to the bay
area, but very few people seem to know about this gem.
The most unique thing about the Elkhorn Slough is probably it's
concentration of endangered sea otters. Roughly 5% of
California's population of sea otters live in this relatively small slough.
Nearby Monterey Bay Aquarium, which does lots of work to protect these sea
otters, will release rescued otters into the
slough and monitor the population here closely. Simply visiting the harbor
area with some binoculars will virtually guarantee sightings of several otters
any time of the year.
In addition to otters, the slough is home to a number of other wildlife
species, some permanent and others migratory. I generally see my fill of seals
and sea lions, as well as several large birds such as pelicans. Occasionally
you'll see some blooms of large jellyfish in the water.
The slough is easy to reach. About an hour's drive from San Jose, it's
located halfway between Santa Cruz and Monterey along California's coastline
adjacent to a little town named Moss Landing. If you've ever driven past the
area, it's distinctive for two massive cooling towers from a power plant rising
out the flat coastal landscape. On a clear day, these towers can be seen from
either Monterey or Santa Cruz.
Visiting is easy and you can see a good deal by foot, but I'd recommend exploring in a kayak. There are two kayaking outfitters in the moss landing harbor, and I've gone out with both depending on the day:
Kayak Connection: $35/single, $55/double kayak. Has a small parking lot for customer's use. Has dock access for the kayaks, which makes getting in and out a little more finicky, but also doesn't require wading into the water from the shore.
Monterey Bay Kayaks: $30/single, $60/double kayak. Must pay for parking in the moss landing harbor. You launch your own kayak directly from the shore.
I've never bothered with a tour or anything, just a kayak rental for a few hours. The slough is long and narrow making it both impossible to get lost in and also impossible to miss anything. The protected waters are very calm, so the brief kayak training offered as part of your rental is more than sufficient for a complete beginner. They will also outfit you with life vest, spray skirts and jackets, etc. Wear comfortable clothes that can get a little wet, but no special clothing is needed.
I've also never bothered with reservations except for a large group. Only once have I shown up and one of the two outfitters was out of kayaks for the day, but the other still had plenty.
The outfitters will walk you through all of the logistics when you arrive: where to paddle, when to return, how far to go, best places to look for wildlife. However, if you want a preview, here's a map of the slough:
The kayak outfitters are located on the northeast shore of the harbor which is on the west side of this map, near hwy 1. To make navigation easy, just plug one of the two outfitter's addresses into a GPS. The north and south parts of the harbor only connect via Hwy 1 which is a pain to enter, so don't get off onto the south harbor at Moss Landing road, just turn directly into the north harbor area, where you'll see signs for Kayak Connection, the Yacht Club, and some shop selling pots. If you want a place to eat however, the south harbor has several restaurants.
The slough itself can be kayaked about 6 miles each way if you have the time and inclination, though you must return the same route. Rough mile markers are pretty clear (a bouy around mile 1, a dairy around mile 2, etc) and will be pointed out by your outfitter. For a more relaxed adventure though, most of the wildlife hangs out pretty close to the ocean, so you need not go more than a mile to see what you came for.
If you have the luxury of selecting your date and time, you may want to select a time when the tide is going out. This way you'll end up working a bit harder as you enter the slough, but can float on out when you tire and want to return. Also, sometimes the afternoon will present light winds working against you when returning, so having the tide working for you will help. If you give one of the outfitters a call, they can tell you about the tides and winds for the day you'd like to go out and give you relevant advice.
]]>Green River Canoeing Trip2015-05-27T00:00:00Zhttps://gregable.com/2015/05/green-river-canoeing.htmlFive day canoe trip down the Green River to meet up with the mighty Colorado.
Last week I embarked on a canoe and began a 52 mi trip down the Green River for 5 days. Each night, we'd make port off to the side of the river wherever we found a good harbor, set up camp, and then repeat the next day.
This was my first time on a boat trip longer than a day. While I had the backpacking dialed in already, the seafaring I wasn't as sure about.
The trip started at the boat ramp in Mineral Bottom on the Green River in Canyonlands National Park where our group of 5 put in two canoes filled with pack supplies and one kayak. We floated and paddled all the way down past the Confluence with the Colorado River where we were picked up by a jet boat run by Tex's Riverways.
Day 1
Logistics for the trip were different than your normal backpacking trips. This stretch of the river is very calm, so canoes can be loaded up with lots of beergear and floated down river. Each of our two canoes could supposedly carry 1,400 lbs, so we were able to bring two coolers, large stove, cast-iron dutch oven, tables and chairs, portable toilet, ~30 gallons of water, etc. Tex's rented us the boats and much of the gear, as well as arranged transport to/from the river. Then they gave us a few pointers and told us they'd (hopefully) see us again in 5 days.
Driftwood fires allowed, but only in metal firepans. A firepan was required whether or not you planned on having a fire.
All human waste must be carried out, though peeing into the river is also allowed. Yes, if you live in the southwest, I urinated into your water supply.
Only about 10% of the archaeological sites in the park are marked on maps, and they'd like to keep it that way, so disable geotagging of your photos.
Must carry an extra paddle, extra PFD, first aid kit, vessel repair supplies (apparently a roll of duct tape was sufficient), and bailing device (cut in half detergent bottle with handle worked for us).
We had maps of the whole river with us. Devon from Tex's gave us some great
pointers about where to find campsites and a few points of interest along the
river. I was able to keep up with the turns and canyons in the river and knew
exactly where I was. However, as we approached areas where we wanted to pull
out of the river I was unable to find any port to exit the river. The river was
running high and the riverbanks were right up against what seemed like an
impenetrable wall of
Tamarisk.
We passed several areas where I knew there was supposed to be a campsite and
didn't see any spot to pull out of the river. Eventually Jim caught up to me
(I was in the lead boat) and explained that the access points were very narrow
breaks in the trees that you could hardly see until you were right on top of
them. I had already passed several and had traveled much farther downstream
than we had planned for this first day.
Eventually we found a tiny rock ledge where we were able to pull up all 3
boats and we settled in for the first night with some delicious sloppy joes
and smores. Our spot was across the river from the area known as Potato Bottom.
There were no clouds in the sky by the time we were sleepy, and not a single
bug flying around, so we didn't bother pitching tents. I just watched shooting
stars until falling asleep.
When we had first checked in at Tex's before the trip, they asked us if we
could do them a big favor. Apparently they put a group on the river the day
before our departure but they had forgotten to give them their cozy canoe
chairs. We were entrusted with finding this group on the river and delivering
canoe chairs. We were told where to expect them to be camping, but when we
arrived at that point on Day 1, they were no where to be found. In fact, we
hadn't seen anyone else on the river the entire day. Today was a bit less
secluded.
Along the way, we met several boaters who we inquired as to their canoe
chair situation. None of them were the group we were searching for. Some folks
camping on the shore told us that they thought they saw a group matching our
description that had passed along that point hours before us.
We also passed up the 'party boat' who were planning on continuing all the way down to lake Powell. Despite flying a pirate flag on my canoe, we were unable to convince these guys that they had too much beer and should jettison some.
For lunch we pulled into Anderson Bottom, an interesting feature geologically. It's a canyon that the green river used to flow through until it eventually eroded the wall in between it's sections and became shorter. Up to the north was a narrow slot canyon which we headed out to. Unfortunately it was flooded, preventing us from exploring into the canyon.
Along the hike, we saw a few other hikers also exploring the same area. We got their attention and were surprised to learn that they were the group missing canoe chairs. They had camped at a different campsite along the same bottom from the one we pulled into and were out hiking as well. Everyone was surprised how lucky we got to find them during this one random hike we made for lunch. They apparently were veterans, having done this trip several times. As we were to hear from many others we met along the route, they took a longer trip: 11 days. They gave us some tips on where to camp for the night, an easy-access canyon named Holeman a few miles further down the river.
For dinner, we made a charcoal fire and grilled up some steaks! That night was by far the warmest on the entire trip. 80F or so, and a tiny bit of rain forced us all into our tents. Worse were the high wind gusts that would blow the fine sand up underneath the tent fly and through the tent mesh. I decided to bury myself in my roasting mummy bag to hide from the sand. I didn't sleep terribly well that night.
Day 3
We all had agreed that Day 2 had been rushed. We took too long getting up,
taking down camp, progress on the river was slow due to upriver winds, we
didn't make as much river distance as we had planned putting us slightly
behind schedule, and we had gotten into camp later than we wanted. On Day 3, we
reversed the trend. Up early, quick packing, on the river before 10am.
I'm going to leave out locations due to the photos I'm going to post. We
decided to do a hike / scramble up and out of the canyon a bit. We ended up in
an area of archaeological interest with lots of petroglyphs that were not on
the map. The excitement of finding these on your own really makes them far
more special than those found behind rails and signs and next to parking
lots.
Petroglpyhs in an unmarked canyon.
Day 4
As we were on a 5-day trip, we would be exiting the river tomorrow morning. We had to be packed and pulled out at a suitable spot below the Confluence with the Colorado River by 10am the next morning. Rather than try to rush it on the last morning, we decided to camp somewhere tonight that we could be picked up from in the morning. Fortunately we didn't have too many miles to go.
Our exploration today ended up being Water Canyon. On the way in, we ran into a small family of bighorn sheep.
Water Canyon was aptly named. We saw more water in this canyon than the rest we had explored combined. It wasn't flowing that much, but there were little pools everywhere we could have filtered from. Fortunately we had brought plenty of water and didn't have to mess with getting more from these pools.
Camp was on the Colorado river this time. The view was amazing, this photo doesn't do it justice. The only problem was that our spot was a bit overgrown.
That night we finished our beers, cooked cornbread and chili. Dessert was dutch oven peach cobbler. We shared the site (and stories of the trip) with another group also exiting the river the next day.
Day 5
Pickup day. An easygoing, slow morning. We had to clean out the silt from our boats and pack up for Tex's to pick us up in their jetboat. We got to jetboat up the Colorado river for two hours. Not too eventful.
Pro-tip though from someone who learned this the hard way. Regardless of the ambient air temperature, the jet boat ride is cold. It moves pretty fast and the wind whipping past you pulls all the heat out of your skin. Do not pre-pack your only jacket within a dry-bag within another dry-bag that gets thrown on the jet boat in an inaccessible place. Have warm clothing handy for the ride even if it's 100°G.
]]>Mission Peak residents block hikers2014-09-16T00:00:00Zhttps://gregable.com/2014/09/mission-peak-residents-victory-over.htmlThe wealthy homeowners who built homes at the base of this urban, public-access peak are fighting to restrict access.'Mission Peak Fremont CA' by Kevin Collins from Alameda, California, USA
This week marks my 40th trail hike up Mission Peak this year. A planned summer mountaineering trip to climb Mt Rainier got me interested in Mission Peak. Its steep climb and nearby access made it the ideal training hike. As with most training, I needed to exercise regularly, which for me meant weekday evenings. My standard plan was to hop off of work, drive over to Mission Peak, and climb the mountain for 2-3 hours with a rewarding break to watch the sunset at the top. Sure, there's always a gym, but I never could stand the monotony of walking up a stairmaster. Mission Peak, being outdoors with fresh air and beautiful views was a treat as much as good exercise.
There was really only ever one park that met all the necessary criteria of being within a reasonable drive, a good climb, and most importantly - being open late enough for me to go after work. In Mission Peak's case, the park hours are 5AM - 10PM. Peninsula parks all close at sunset. The next closest park, Henry Coe, open 24 hours, is a ~2hr drive in traffic one way.
My weekly climbs up Mission Peak paid off. I got in shape enough to summit Mt Rainier in July. Along the way, a few coworkers started joining in and carpooling with me after work, all of them feeling great about the exercise and fun they were having.
I write all of this saddened after reading a poorly researched article on SFGate this morning describing how East Bay Parks has decided to change the opening hours on this one park in response to complaints from homeowners living nearby the park entrance. The new seasonal hours are posted on the East Bay Park's website and are seasonal rather than the flat 5AM-10PM before:
Sep 29 – Oct 31:  6:30am – 7:30pm
Nov 1  – Feb 1:   6:30am – 6:00pm
Feb 2  – Mar 7:   6:30am – 6:30pm
Mar 8  – Mar 29:  6:30am – 8:00pm
Mar 30 – Aug 30:  6:30am – 9:00pm
Even for the 5 summer months of the year, this park is now open for 2.5hrs less every day. My evening weekday hikes will simply become impossible in 2 weeks.
Most parks and communities are spending a lot of effort trying to get folks outdoors and exercising in their community. East Bay Parks has succeeded in doing just that with Mission Peak but now seems to be doing everything it can to keep people away.
The main issue is that the park entrance has a relatively small parking lot, with only 42 parking spaces, while on the busiest of summer days there can be 500 cars parked, mostly on public side streets. All of the usual issues that come when homeowners in suburbs see increased traffic around their homes are at stake. These issues aren't without any merit. You can view the main arguments in this summary video by the Vintage Grove Neighborhood Watch Group
My thought is that many of the issues pointed out in this video are incredibly rare. I've parked on these streets more than most people and have not once seen a driveway or fire hydrant even partially blocked. Generally people park on streets here as or more respectfully than in other places.
This is not a park where people bring their family and a picnic that they roll out on the nearest picnic tables. There are 2 picnic tables in the park, nobody uses them, and everyone there is there to hike at least part of the way up a very steep mountain trail. Once in the park, there is no way that even a radio at full volume would be even audible from the nearest homes. Flashlights are far away dots.
Many of these homes are set far back from the roads inside high walled communities in an area code where the average home price is $2 million. Here's one of the views from the nearby sidewalk: Google Streetview. Many of these homes are fairly deeply hidden behind gates. Certainly the ones affected by weekday traffic fall into this category. If the weekend traffic really does spill further out into the community (I've never observed such) as in this video, then some of the further away homes are a little closer to the public roads. However, the weekday night traffic (times affected by the new curfews) spills only onto Vineyard Ave which has a sum total of only 6 homes along it, all moderately set back from the road.
This is the kind of activity we want more of in the Bay Area. People getting out into nature, getting healthy, and having fun. At Mission Peak, people are doing this by the thousands. There are numerous social groups that hike the mountain together. The Wings of Rogallo Hang Glider group flies off the ridge. At night, REI teaches nighttime photography classes. I've also seen folks using the park for amateur astronomy or doing a night hike to simply watch meteor showers. Much of this is about to end.
I worry that a hundred or so wealthy homeowners would like this gem of a park to be a kind of private park for those who live nearby. Since it's public land, paid for by tax dollars, this isn't possible, but there are things being done to make it more difficult for the public to use. Shorter hours are a big step. Other proposals are to require resident permits for any street parking, limiting public parking to the 42 spots inside the park parking lot. There are proposals to charge entrance fees, with passes for locals for reduced rates. You can get a feel of the desire for this to be a quieter more private park even from the video text:
"Hiking up the lower trail, I've got lots of company"
"The majority of these people are first time hikers on mission peak"
"The majority of these hikers are NOT from Fremont or East Bay"
"Counting sensors at the trailhead have recorded 6,000+ hikers in a single day!"
"Its popularity attracts hikers from all over the Bay Area"
One of the proposals by the East Bay Parks was to build more parking inside the park, away from residents. Proposals included two different options for building parking with 250-300 spots in each. A pdf showing the parking area proposal can be found posted online. This idea was brought up after the 2012 summer season. The Fremont city council unanimously supported it; the local residents opposed it. This suggests that the residents aren't strictly worried about street parking, it's just an easy issue to get public support on. You can read summaries of the public comments here, here, and here. Essentially there is strong support from hikers and users of the park for more parking, and strong negative comments from locals who oppose any type of increased access to the park.
"teenagers are there, promoting drinking, nuisance to residents"
"People should have to pay for access to the resources"
"Hiker for over 15 years, this is one of the better hikes in the area. Understands neighbor concerns but the park was there first.
"I would STRONGLY suggest that a 'permit parking' system be put in place... Only homeowners ... would be issued the parking permits."
"I think at this point, the solution has to be to restrict access"
As for concerns about shortcuts and erosion, the trail restoration programs by local schools and biking groups have been working. The erosion of the trail is decreasing while the number of visitors is increasing. Here are some aerial images from Google Earth. Each pair shows one image from 2011 and one image from 2014.
Bottom of the trail, note the clear parallel bootleg trail to the left of the main trail, which has all but disappeared:
November 2011 (left) vs September 2014 (right)
A little further up, in 2011 there is a clear bootleg trail running up to the bench in the upper right hand corner of the image. In 2014, it's invisible except from the air:
October 2011 (left) vs June 2014 (right)
The same trees as seen at the top of the previous image are now at the bottom of this one. As you can see there were tons of trails taking short-cuts up switch-backs. Most of these are gone. There is some new erosion along the rightmost curve in 2014, but it's just feet away from the main trail, mostly it's the trail spreading out more than a new trail forming:
August 2011 (left) vs June 2014 (right)
A little higher up. Most of the bootleg trails are gone. There is a new one that started forming on the upper left switchback, but it's also already been repaired, signs posted, and I've seen almost nobody using it any more, it should hopefully be restored over time. Just a reminder that this needs continuous attention.
August 2011 (left) vs June 2014 (right)
So that none can say I'm picking and choosing my photos selectively, these images cover the entire trail. This last set shows the peak at the very top where erosion has not been effectively controlled thus far. The official trail is the one to the left which doesn't actually go all the way to the peak. It's less popular than the bootleg trail along the ridgeline with better views. Most hikers aren't actually aware of the official trail as there is no clear signage at this intersection and the official trail doesn't visually appear to be headed up the mountain from what a hiker could see. This can and should be improved with a maintained trail to the top of the peak, probably along the ridgeline where hikers prefer to go:
August 2011 (left) vs June 2014 (right)
Update (2015): This section of the bootleg trail has undergone some serious work, fencing off areas and directing traffic up the back side of the peak. The erosion is quickly healing here as well.
Lastly here's a video showcasing some of the restoration work. It's done by volunteers under EBRP's supervision, groups are often organized by social media (grr @ 'selfie mountain' reporters):
Similarly with trash, there is virtually zero anywhere on the trail when I hike. I regularly see volunteers on my hikes picking up any trash they do find. I do the same many times. As a result of this attention, the park is more pristine than many less busy parks. There is some trash tossed out along the roads / parking, but it also doesn't seem to accumulate. I've not observed anyone picking it up, but I suspect it's happening as there is always going to be some trash. There is graffiti especially at the top of the peak, but it doesn't build up as volunteers spend hours regularly scrubbing it off the rocks.
Not to mention that none of the above: traffic, parking, trash, noise, curfew violations, erosion, emergency request, etc are reduced by decreasing hours. Those things happen during the day as well, and in far greater volume.
The trail is quite safe, even at night. The large numbers of people hiking it in the evenings ensure there are plenty of people around to help. I've helped carry a large dog down the trail that had collapsed. Folks are quick to offer water to others who look like they could use it. Cell phone coverage is great, and the trail is a fire road 95% of the way to the top, making it possible to access in an emergency. This can't be said for many of the other parks in the area, or even other trails to Mission Peak. The trail that EBRP is directing people to after dark, Ohlone College, has a lengthy portion in a dark, densely forested valley adjacent to a minimally used road in the middle of nowhere. It seems like a fairly dangerous stretch of trail compared to the Stanford Ave trail:
The trail from Ohlone College passes through a more dangerous, densely wooded area, behind the ridgeline. It's also less of a workout and offers poorer vistas along the way.
I've climbed Mission Peak from Ohlone College. It climbs more gradually, behind a ridge with less views until nearing the very top. It's a great alternative, but isn't as nice of a hike. It's less safe - at night, I was the only one on the trail. The parking lot near the trail at Ohlone College is not that large or that empty. Ohlone College has expressed disinterest in encouraging hikers to use their parking lot for hiking up mission peak at the current time.
This isn't just about Mission Peak. Other popular bay area parks should have later opening hours as well, which would serve to take some of the load off of this one. A great example is Rancho San Antonio managed by the Midpeninsula Open Space District.
People from around the bay area love Mission Peak. I hope that some of these changes are reconsidered in the future.
]]>Mt Rainier2014-08-02T00:00:00Zhttps://gregable.com/2014/08/mt-rainier.htmlTrip report for a six day mountaineering and summit of Mt Rainier.Last week I spent 6 days climbing Washington's Mt Rainier. This was one of my first introductions to glacier mountaineering, and as such me and my buddies decided to take a longer trip and learn some skills along the way. The most common route up to the summit of Rainier is a two day, 1 night trip. We took longer, but learned a lot of new skills along the way with IMG's glacier skills seminar.
Preparation
Mt Rainier, at 14,410 ft is only 100ft shorter than the tallest peak in the lower 48 (Mt Whitney in CA), but Rainier's trailhead starts over 1,000 ft lower. In addition, Whitney does not require travelling over glaciers to summit, which makes Rainier much more technically challenging. As IMG says, "you will want to arrive in the best shape of your life".
My main training regimen consisted of climbing a small peak in my city's backyard named Mission Peak, a 2200 ft climb over a distance of about 2.5 miles. I climbed this once a week after work, as the park was unusual in that it was open until 10pm. If you are in the bay area, this is a fun trip to do in the evening. It's a popular trail, lots of folks try to catch the sunset from the summit, so it becomes a bit of a party at the top.
Before spending 6 days on the mountain with IMG, we met up at IMG headquarters to do a gear check. Our guide, Ian, met us there and had us lay out all of our gear and we went through each piece one by one. Due to the amount of gear we did need to take, he had us all pare down our extraneous gear to just the essentials. Everything else was left behind. I added back in a few luxuries that evening: a small inflatable pillow, some down booties, and my 2lb DSLR camera. In addition, we added in a few pounds of group gear such as tents, pots, fuel, and food. Ian then went over some basic skills such as blue bagging (bagging/packing out all waste) as well as answering our questions about the next day and the trip as a whole.
Next morning, we were up bright and early to shuttle to a trailhead near Paradise visitor center and begin our climb. It was a pretty short hike to the first camp, only about 2 miles made a little harder by the fact that our packs were quite heavy. The weather was inside clouds and walking on snow, so we wondered how one would navigate in such terrain with few landmarks to go on. When we got to camp, the guides gave us a crash tutorial on setting up 4 season tents in the snow (hint: it involves shoveling out a flat spots and burying anchors in the snow) and we got to work getting settled in. The photo below was taken the next morning when the clouds finally cleared, we had no idea there was a view to be had from camp until day 2!
After this we got to work learning how to walk efficiently on steep snow, practicing on the side of a ridge near camp. We had a bit of a scare when Matt post holed through a thin ice layer with one foot, but nobody was hurt. Next, we learned how to self arrest with our mountaineering axes. This is an essential skill - imagine you fall and are sliding down steep slick ice, how do you maneuver yourself to catch your axe on the snow and arrest your slide without having the axe rip out of your hand or rip your face open. We practiced arresting from all possible falls: head first, feet first, face down, face up. This was a ton of fun as it's basically a lot of sliding downhill in the snow. I wish I had some video but the clouds were too dense and I didn't have enough time.
When we got onto the Paradise Glacier, it was time to learn how to work as a rope team. Crevasses are large vertical holes in glaciers that can drop tens or hundreds of ft, which is not something you want to fall in. The problem is that the tops of the crevasses can get covered in thin layers ice and snow so that you can't easily see the crevasses, but you can still break through the layer ice below your feet. To mitigate this risk, we travel on glaciers with each person spaced out 40 or so ft from the person in front of them, but attached via a rope and harness. If one person falls, the others on the team arrest on the snow and then rescue the fallen team member. This particular training built on what we learned on day 1. We practiced this today on the way to camp - tying into a rope, maintaining good distance and communication with the other rope team members.
This time the area for the camp was a bit steeper and required a lot more digging out of a flat area for tents. We also were going to stay at this camp for two days, so we spent a little more effort making it comfortable, cutting out some steps in our terraces as well as cavities for gear and so forth. That evening we were treated to a lesson about glacier geology. One of our guides had done their master's work on the subject and gave us a little introduction to the basics, while standing on a glacier!
Day 3, 'Rest' day
Today we weren't planning to move to a new camp. This was nice timing as we awoke to unexpected rain at about 4am. We did not get a break from lousy weather until after dinner. Warming up was to one of the best breakfasts of the trip, hot bacon and cheese bagel sandwiches.
Despite the weather, we had stuff to learn! Most of today was spent doing technical work on knots and ropes. Much of this could be done inside the group cook tent with a little storm protection, but whenever the rain abated a bit, we'd run outside and do some more practice there as the tent was a tad crowded.
The final goal for today was to be able to go from an arrest position on a rope team with a member in a crevasse to building an anchor in the snow, transferring the load to the anchor and then building one of various pulley systems to safely pull the victim out of the crevasse. At the end of the day, we got into pairs and practiced exactly this. Unfortunately due to poor weather, we didn't actually get ourselves into a crevasse, but we simulated it on some steep terrain.
In addition, today we went over some advanced navigation techniques with a map, compass and altimeter. We discussed in some detail how you would navigate in whiteout conditions where angles to distant landmarks were not available.
Finally, after dinner, the clouds parted for a little while giving us some fantastic views of the valleys below with clouds floating through. I captured this series of images which ended up being some of my favorites of the whole trip.
Not Supported.
Day 4, Moisture Control
Today, the plan was to take down camp and move up the mountain to Muir Camp. The weather set us back again this morning. We awoke to thunder and lightning. At one point the count between the flash and bang was only a second or two, so it was largely over top of our heads. Rather than get an early start, shelter in place was the plan. Plastic foam pads and staying low to the ground was the safest bet. Walking across a flat snowfield swinging steel ice axes was not. Even if not for the lightning, we small marble sized hail was coming down on our tents.
After the worst of the storm stopped, we decided to get moving. The weather was likely to stay all day, so there was no sense in waiting. The rain was still coming down sideways, but we broke down camp and hiked up to Muir in our storm shell layers ("battle armor"). Unfortunately even gore-tex doesn't 'breathe' or evaporate moisture if it's soaked on the outside. Thus, any sweating we did on the way up just stayed in our clothing and soaked it out too.
Muir Camp delimits, at least psychologically, the point between lower and upper mountain. Above Muir, we'd be travelling exclusively on rope teams and not for training. For most teams, Muir Camp is the end of day one and the camp from where makes a summit attempt. Muir is also quite lavish - there are a few small structures with bunk beds, an evaporating toilet, even a place to discard used blue bags. We all shared some bunks inside the Gambu hut, named after Nawang Gombu, a nepalese mountaineer who guided on Rainier until a few years ago.
Our focus that afternoon was on getting clothing dry. We ran rope lines throughout the Gombu hut and hung up the most critical clothing. Very little dried completely, but it was no longer dripping wet when we put it on the next morning.
That evening our guides made us some absolutely fantastic burritos for dinner. Apparently pan frying a burrito in olive oil is crazy delicious. Aside: Olive oil is also a super backpacking food. In addition to simply being healthy, it weighs in at a whopping 230 calories an ounce (candy bars are only 100-150 calories/oz). It's stable at a variety of temperatures. It can be added to almost any food and that food magically tastes better. You can use it to loosen jammed up zippers or other gear. It even has useful properties when applied to blisters or sunburns. As a high-fat food, your body must spend a little energy to break it down, which helps you stay warm, so it's great before sleeping.
That evening we spent some time going over rappelling setups and self-climbing rigs. I feel guilty, but I wasn't fully engaged with this lesson. I was cold, wet, and fairly tired. We also learned a bit about altitude related illnesses, but this was fairly familiar stuff to me as I had some first hand experiences on Kilimanjaro.
Day 5, Ingraham Flats
The clouds were still rolling around the next morning, but the rain had dropped down to lower elevations. Climbers coming up from below were soaked, but we were seeing more and more sunlight as the day progressed. We were in pretty good spirits. Today's plan was a short walk up to our final campsite at Ingraham flats. We had plenty of time, so we did a little extra practice of some of our rope and crampon skills.
Early in the afternoon we headed up to the Ingraham Flats. The Ingraham Flats is a campsite on top of the Ingraham glacier. It has an amazing view, one of our guides put it in his top 5 camps worldwide. I can easily see why. Look at the photo above for the camp tents. You can see them on the glacier near the upper left hand side (yellow/orange pixels). The area is apparently a flat part of the geology underlying the glacier and is not prone to crevasses opening up.
Surprisingly, we didn't have to carry tents up to Ingraham Flats, we left those behind at Muir. The tents at Ingraham were buried intentionally under several feet of snow. We dug them out of the snow and set up camp for the last time. The guides have an agreement with the rangers that they can leave tents out at Ingraham for the season as long as they are only set up and visible when they are actually occupied. Another team was coming in the day after us, so we didn't have to tear down the tents.
The rest of the day was short and restful. As soon as camp was set up, we laid down on our sleeping bags. We got up for an early dinner and went to back to bed with several hours of daylight remaining.
Day 6, Summit Bid
The mountain had seen 2 full days of full on storm weather, including hail. Nobody had been on the mountain above camp Muir since our Day 2. Big changes in weather mean big problems. I think most of us expected that the summit would be unattainable due to weather conditions, but we were going to climb as high as we could until it was no longer safe to go further.
Summit day started with a early start around 12:30am. For several hours we were climbing with only our headlamps, but still in a rope team and full climbing gear. At several points our guides continued to be surprised that the rain had made it as high as it did as well as surprise that we were still making progress. There was no visible trail ahead of us. At a few points, we'd have to stop and the guides would go ahead with shovels and cut a small ledge for safety.
I began to really struggle with breathing the last 1,500 ft of elevation or so. The air was thin, I was getting tired and having trouble keeping up with the rope team. Eventually, with some significant help from the guides and team, we made it to the summit of Rainier. We were the first team to summit in 4 days, followed only a few minutes later by several other teams who had gained on us due to the trail we had been cutting.
Photo of our crew on the mountain, I'm on the left in the orange helmet.
We didn't stay at summit for too long as the plan was to descend the entire mountain by mid-afternoon. We downclimbed and glissaded our way all the way back to the parking lot by about 5 in the afternoon. When all was said and done, we had been going for almost 14 hours with only short breaks. I was sore, exhausted, blistered, and all smiles. We said our goodbyes to each other at IMG headquarters, and again over beers.
Signing the 2014 summit board back at IMG headquarters.
]]>Degrees Gregable2014-06-26T00:00:00Zhttps://gregable.com/2014/06/temperature-scales.htmlMy proposal for an improved temperature scale, clearly superior to both Celsius and Fahrenheit.While recently travelling in Europe, I repeatedly needed to convert between published temperatures in Celsius and familiar numbers in Fahrenheit. It got me thinking a bit about temperature scales.
With distance, the multipliers between units at different scale makes a strong argument for metric units (ie: 100cm/m, 1,000m/km, rather than 5,280ft/mi). Temperature doesn't have this problem as there is only one unit on each scale (degrees). One does not count centidegrees. There is no argument to be made for preferring one scale over another except based on which memorable numbers correspond to real-world values.
Most everyone knows that Celsius is designed around 0° and 100° lining up to water freezing and boiling points respectively. However this definition isn't sufficient for lab purposes. Water freezes and boils at different temperatures depending on pressure and impurities. The technical definition is at one standard atmosphere of Vienna Standard Mean Ocean Water. Then again, how often do most people need to measure the temperature of ice and steam reliably? Not I.
Far fewer people know that 0° and 100° in Fahrenheit also correspond to specific real-world values. 0°F corresponds to a temperature where a brine is made of equal parts ice, water, and ammonium chloride. Such a brine, interestingly, is a frigorific mixture, meaning that it stabilizes to a specific temperature regardless of the temperature that each component started at. Thus, it makes for a really nice laboratory-stable definition of a temperature. Similarly, 100°F was initially set at "blood heat" temperature, or the human body temperature. While not super precise, it was a fairly stable value. As good as anything in the early 1700s.
Today, we can produce very specific temperatures in very controlled environments. We hardly need to use water, ammonium chloride, or blood as the master keys to our temperature scales. Nor do we need to fret about calibrating our thermometers that often. That feature of a temperature scale is simply no longer the most important one. How could we improve temperature scales if we were to reinvent them today?
I present one possible suggestion. Most people primarily use temperature for measuring ambient air temperature for purposes of assessing comfort level. Why not build a temperature scale around the notion of comfortable air temperature?
0° in this scale then can be centered at a very comfortable room temperature. Something around the area of 70°F / 20°C.
-100° and +100° could then be at the limits of human comfort ranges. Something around the area of 40°F/5°C and 100°F/38°C respectively.
New
°C
°F
100°
38°
100°
50°
29.6°
85°
0°
21.2°
70°
-50°
12.8°
55°
-100°
4.4°
40°
Now, the phrase "tomorrow it will be twice as cold" can be represented reasonably in mathematical terms - simply double the current temperature and you'll know tomorrow's temperature, a feat that didn't always work so well with older temperature scales.
We need a new symbol for this new scale, so as not to confuse anyone (more than necessary). I propose °G, pronounced "degrees Gregable".